


Work Smarter with Touchpoint messaging workflow in sibo's Journey
Automate all event-related guest messages to enhance the guest experience, such as sending emails or messages on other channels when a reservation is made, sending online check-in instructions after 1 day, sending event reminder emails, etc. We offer you the opportunity to work smarter and improve the user experience for your guests.
Discover video tutorials and the Step-by-Step procedure to understand how to work Smarter with Touchpoint messaging workflow in sibo's Journey
The Process
Step 1: Access to Journey (the automated messaging)
- To create the best experience for your future guests, click on the "Journey" tab in the dashboard menu.
- In the search field, select the account you want to configure.
- By default, you will land on the Touchpoint view. You can switch to the Messages View, which allows you to see all active touchpoints for your account. You can also click on "Edit" to modify the email template, add new variables, and test your message.
- The Touchpoint view is used to activate and configure the triggers we want for each step of our Journey for our users.
Step 2:
In our demo, we will see how to create two Journey messages in the "Instant Booking Confirmed". The first example will simulate a direct reservation from your website, and the second example will simulate a reservation from an OTA.
Direct reservation
From the Touchpoints page, click on the "Add journey" button (the blue plus sign) in the "Instant Booking Confirmed" section on the right.
- In the Tags section, select the Direct tag from your list or create it if it doesn't exist. Tags are used to enhance your understanding of the touchpoints.
- In the "When should this message be sent?" section, the action will be triggered as soon as the booking confirmation occurs.
- Now, it's time to configure the rules to be implemented. In general, you can have one or multiple rules. However, be cautious of conflicts between them that may block a message from being sent.
- To add the rule for a direct reservation, click on the blue plus sign.
- Construct the logic in the following manner: IF something... then trigger a specific action.
- In the IF condition, choose "Booking type". Then select in the second field ."Is one of". and continue by checking the "Direct" option. Finally, click "Apply" .
- The options in general can be: Yes / No – Equals / Does not Equal / Contains / Does Not Contain / Greater than / Greater than and equal / Less than – Is one of / Is not one of.
- In our demo, we don't need to complete the rule with "AND," but it would be possible to do so. The logic would remain the same as for the "IF" condition.
- In the "Message sent to" section, you have two options: Customer or Internal recipient. We will select "Customer."
- The checkbox allows us to send the message to the guest even if we don't have their personal email address in a SIBO reservation, using an OTA platform/extranet chat. We will check the box for this journey.
- Now, select the properties from the list where this touchpoint should be active and click on Apply.
- If it is the first touchpoint, select a new or existing content for your journey message.
- Expand the Messaging section:
- There are three important sections: "Select Variables," "Email," and "Other messaging platforms."
- The "Select Variables" section contains all the available variables and allows you to make the displayed information in the message body dynamic.
- The title of our message will be "Booking Confirmed Direct"
- In the "Email" section, you can add the subject of your message with or without variables in the Subject field and use variables in the BODY section.
- You can obtain a template to start building your message. Click on the stamp icon (on the far right), a window will open with template choices. Select one and click on SAVE to use it. We can see that several variables are already present in the message body. Of course, it is possible to create your own custom template by styling the template or coding your own HTML template. Click on the smaller and larger sign to edit the HTML code.
- We will select "New message" for our demo and paste the pre-prepared HTML.
- The body of our message contains a thank you message for the guest's reservation along with all the details of the booking. Variables are used to make the displayed values dynamic.
- Click on "Apply selection" to apply your template for this journey.
- Other messaging platforms will be utilized for all other messaging channels. It is crucial to fill in this field; otherwise, the message may fail to send. Please ensure that you provide the necessary information in plain text format.
- You can test the template by sending it to your email address.
- To finalize this step, click on the "Create" button.
Reservation from an OTA
Now let's see how to create the touchpoint for a reservation from an OTA.
- In Tags, select the OTA tag or create it if it doesn't exist.
- In the IF condition, choose "Booking type". Then select in the second field ."Is one of". and continue by checking the "OTA" option. Finally, click "Apply" .
- The "Message sent to" will be sent to the "Customer," and we will check the "Send also by email" box.
- Define the properties where the message will be active. In the message section, we will choose "New Message," and the title will be "Booking Confirmed OTA." We will paste the HTML that we have prepared with the message to thank the guest for their reservation and ask them to complete our online check-in.
- Make sure to also fill in the content for "Other messaging platforms."
- Finally, click on the "Create" button to complete the process.
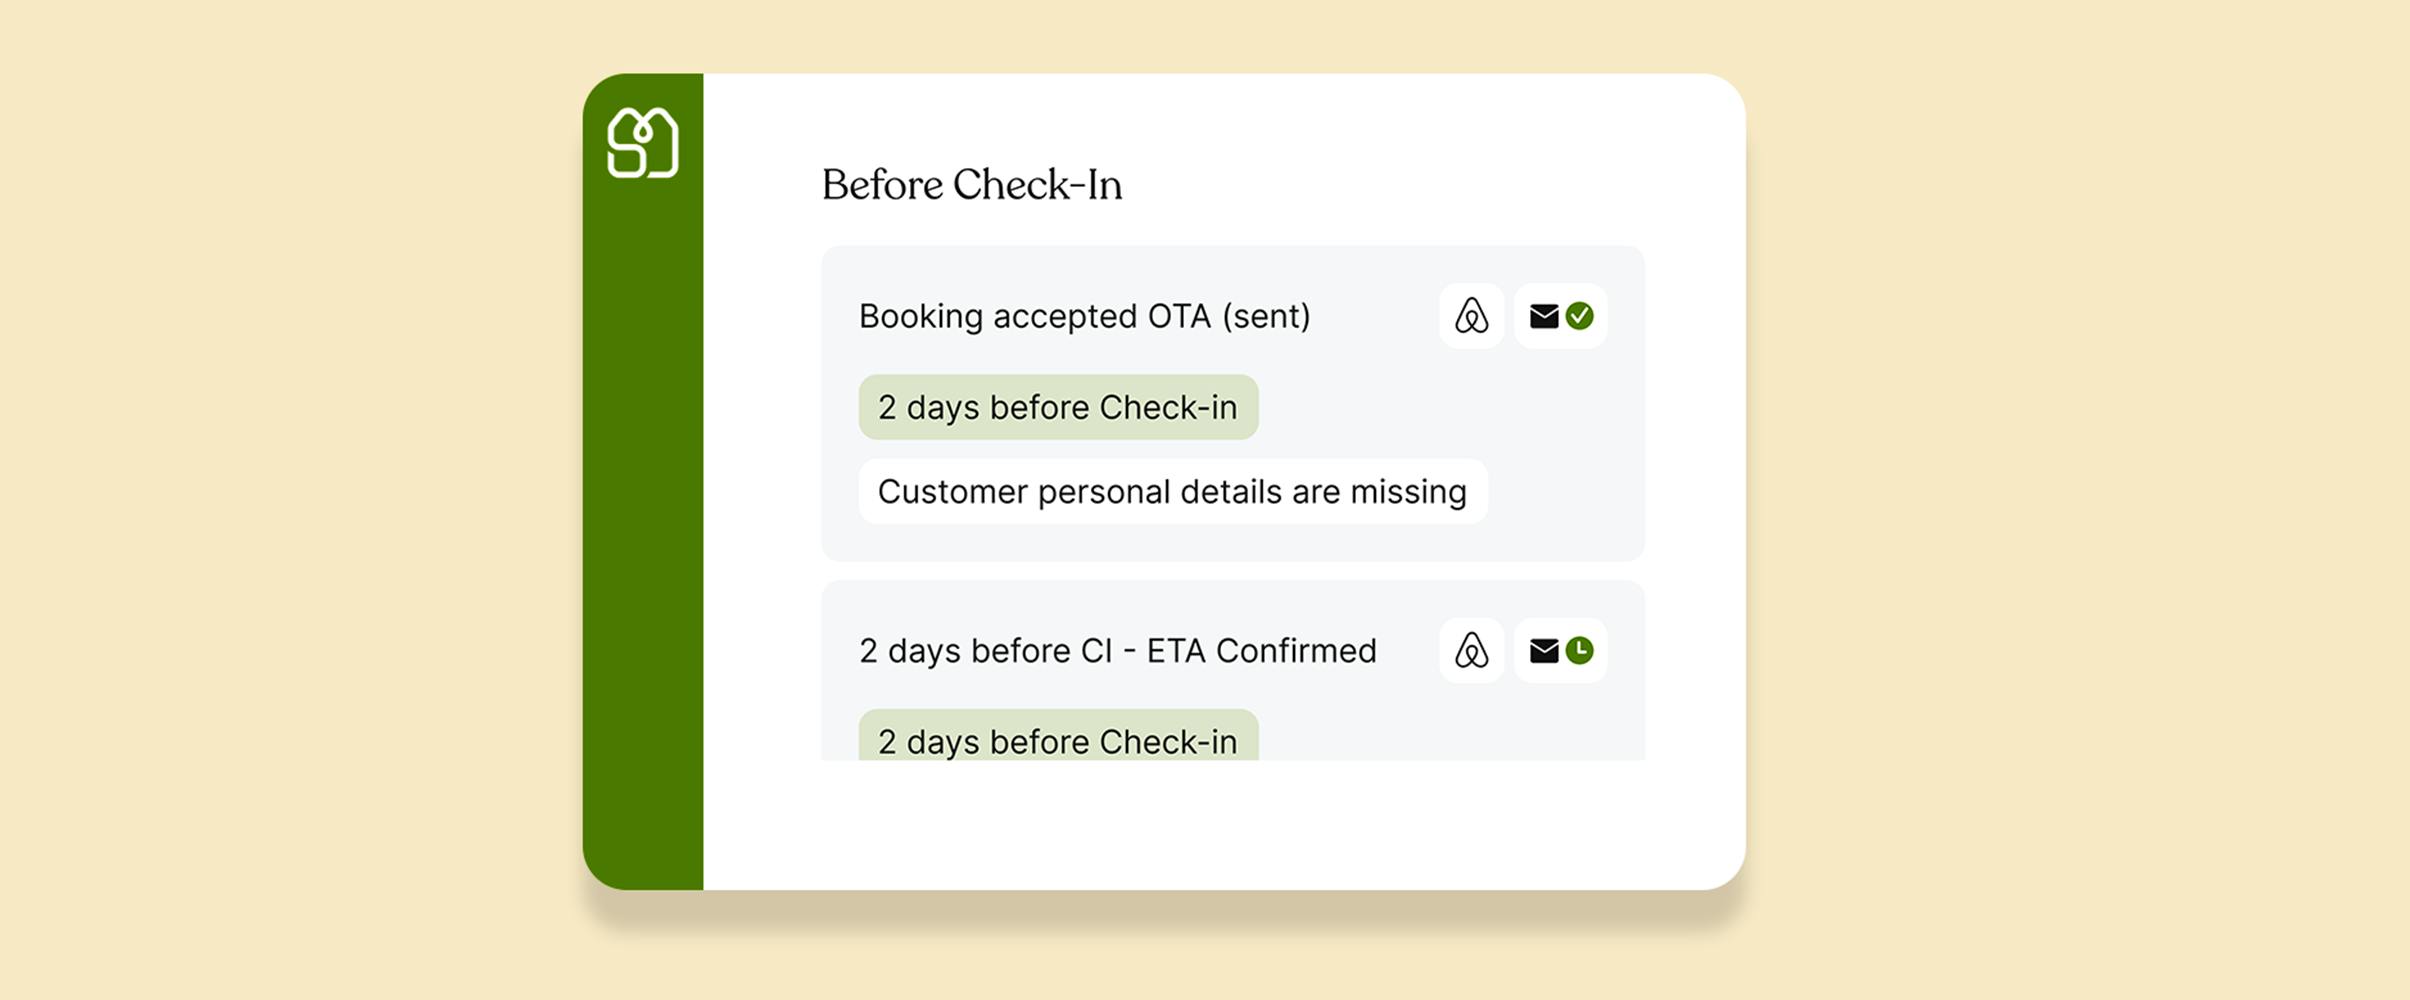
Step 3: Reviewing the touchpoint
If we go back to the "Instant Booking Confirmed" touchpoint, we can review what has been programmed and how many journeys we have. You can see an explanation of the touchpoint we have set up for Booking Confirmed Direct and Booking Confirmed OTA. You can also see who created this touchpoint, the timestamp of creation, and the timestamp of the last modification.
Three actions are available:
- 1. Creating a new trigger point: Click on the blue plus sign button.
- 2. Editing it with limited options: You can add more tags. – You can select or unselect "Send also by email." – You can modify the selection of active properties. – You can change the message.
- 3. Duplicating a touchpoint and following all the steps seen in step 2. This becomes handy when rules change is required.
Step 4: Modifying rules during the experience
You can disable a journey message by removing the properties it is triggered for. For better visibility, we recommend tagging unused messages with a DELETED or NOT IN USE tag”
- Click on the "Clone" icon or the “blue plus sign” to modify the rules and settings.
- In the active trigger point, deselect all properties from the list
- Create or add DELETED or NOT IN USE tag
- Click "Save" to confirm the changes. Please note that a changing the message’s content applies to all the journey messages using it.
Step 5: Modifying a template during the experience
- From the "Message View" screen, you can modify the template.
- Click on the "Edit" button.
- Next, you can change the Message title.
- Add or modify variables in the body of your message.
- Customize the layout of your template.
- You can also modify the message text that will be sent to other platforms.
- You can perform test sends from this window as well.
- Click the "Save" button to save your changes. Please note that a changing the message’s content applies to all the journey messages using it.
Step 6: Specifics for Check In and Check Out touchpoints
Touchpoints are divided into two types:
- Event-based
- Time-based
Check-in and Check-out are time-based touchpoints, as such you can choose how many days before or after you wish the journey message to be sent.
Step 7: Reservation Timeline: Tracking the guest's journey progress
- Click on the "Bookings" tab in the menu.
- Open the page of the desired reservation.
- Once the page is open, click on the rightmost tab, "Journey."
- This will take you to the timeline of the guest's journey, allowing you to see where the guest is in their customer experience.
- To better understand this section, click on "Legend" to learn the symbolism of each icon. For example, a gray checkmark indicates that the message has been sent but not yet read by the guest. And a double blue checkmark indicates that the message has been read. By clicking on the envelope icon, you can get an idea of the email received by the client. It is also possible to view the links sent to the client.
- By default, internal messages and pending condition messages are hidden.
Step 8: Easy way to duplicate entire Journey workflow
Once you have created your first Journey, you can easily duplicate the entire workflow and apply it to another property.
Follow these steps:
- Click on "Listings" in the menu, and then select "Properties."
- Locate and open the property for which you want to clone the Journey.
- Navigate to the "Message" tab and click on the "Clone" button.
- A pop-up window will appear, presenting a drop-down list of properties. Choose the original property from which you want to clone the Journey.
- Finally, click on "Apply" to complete the cloning process.
By following these steps, you can quickly replicate and adapt your existing Journey to multiple properties, saving time and effort in the process.
If you encounter any difficulties in creating your journey, do not hesitate to contact our support services.


Hey it’s time to learn more about theses subjects!
Support videos
Explore a comprehensive collection of support videos designed to help you on sibo every day
Read more +Work Smarter with Touchpoint messaging workflow in sibo's Journey
Automate all event-related guest messages to enhance the guest experience, such as sending emails or messages on other channels when a reservation is made, sending online check-in instructions after 1 day, sending event reminder emails, etc. We offer you the opportunity to work smarter and improve the user experience for your guests.
Read more +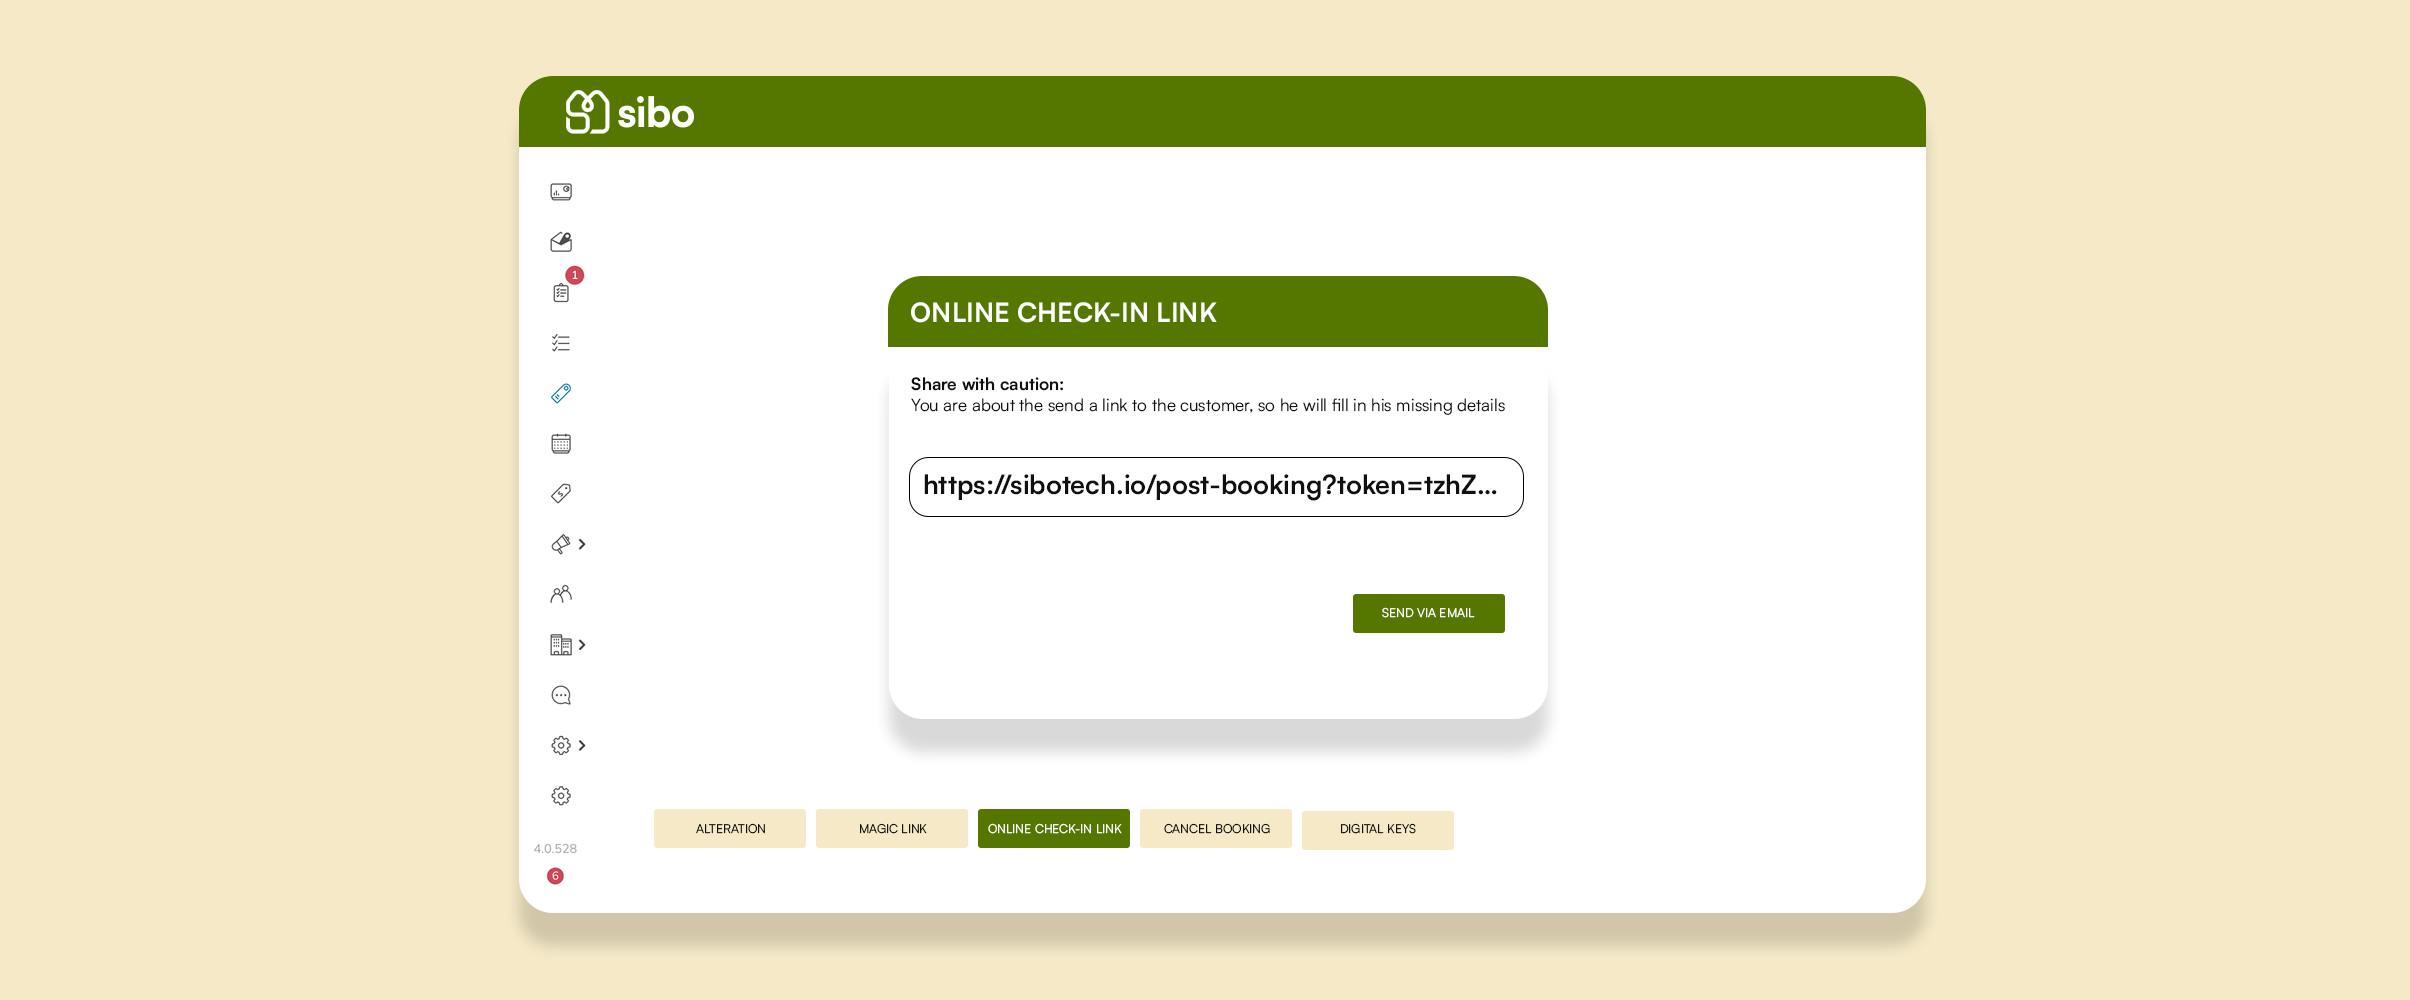
How does the sibo Online Check-In work?
Facilitate your guest's journey with the online check-in process, and receive all the relevant information in sibo prior to their arrival.
Read more +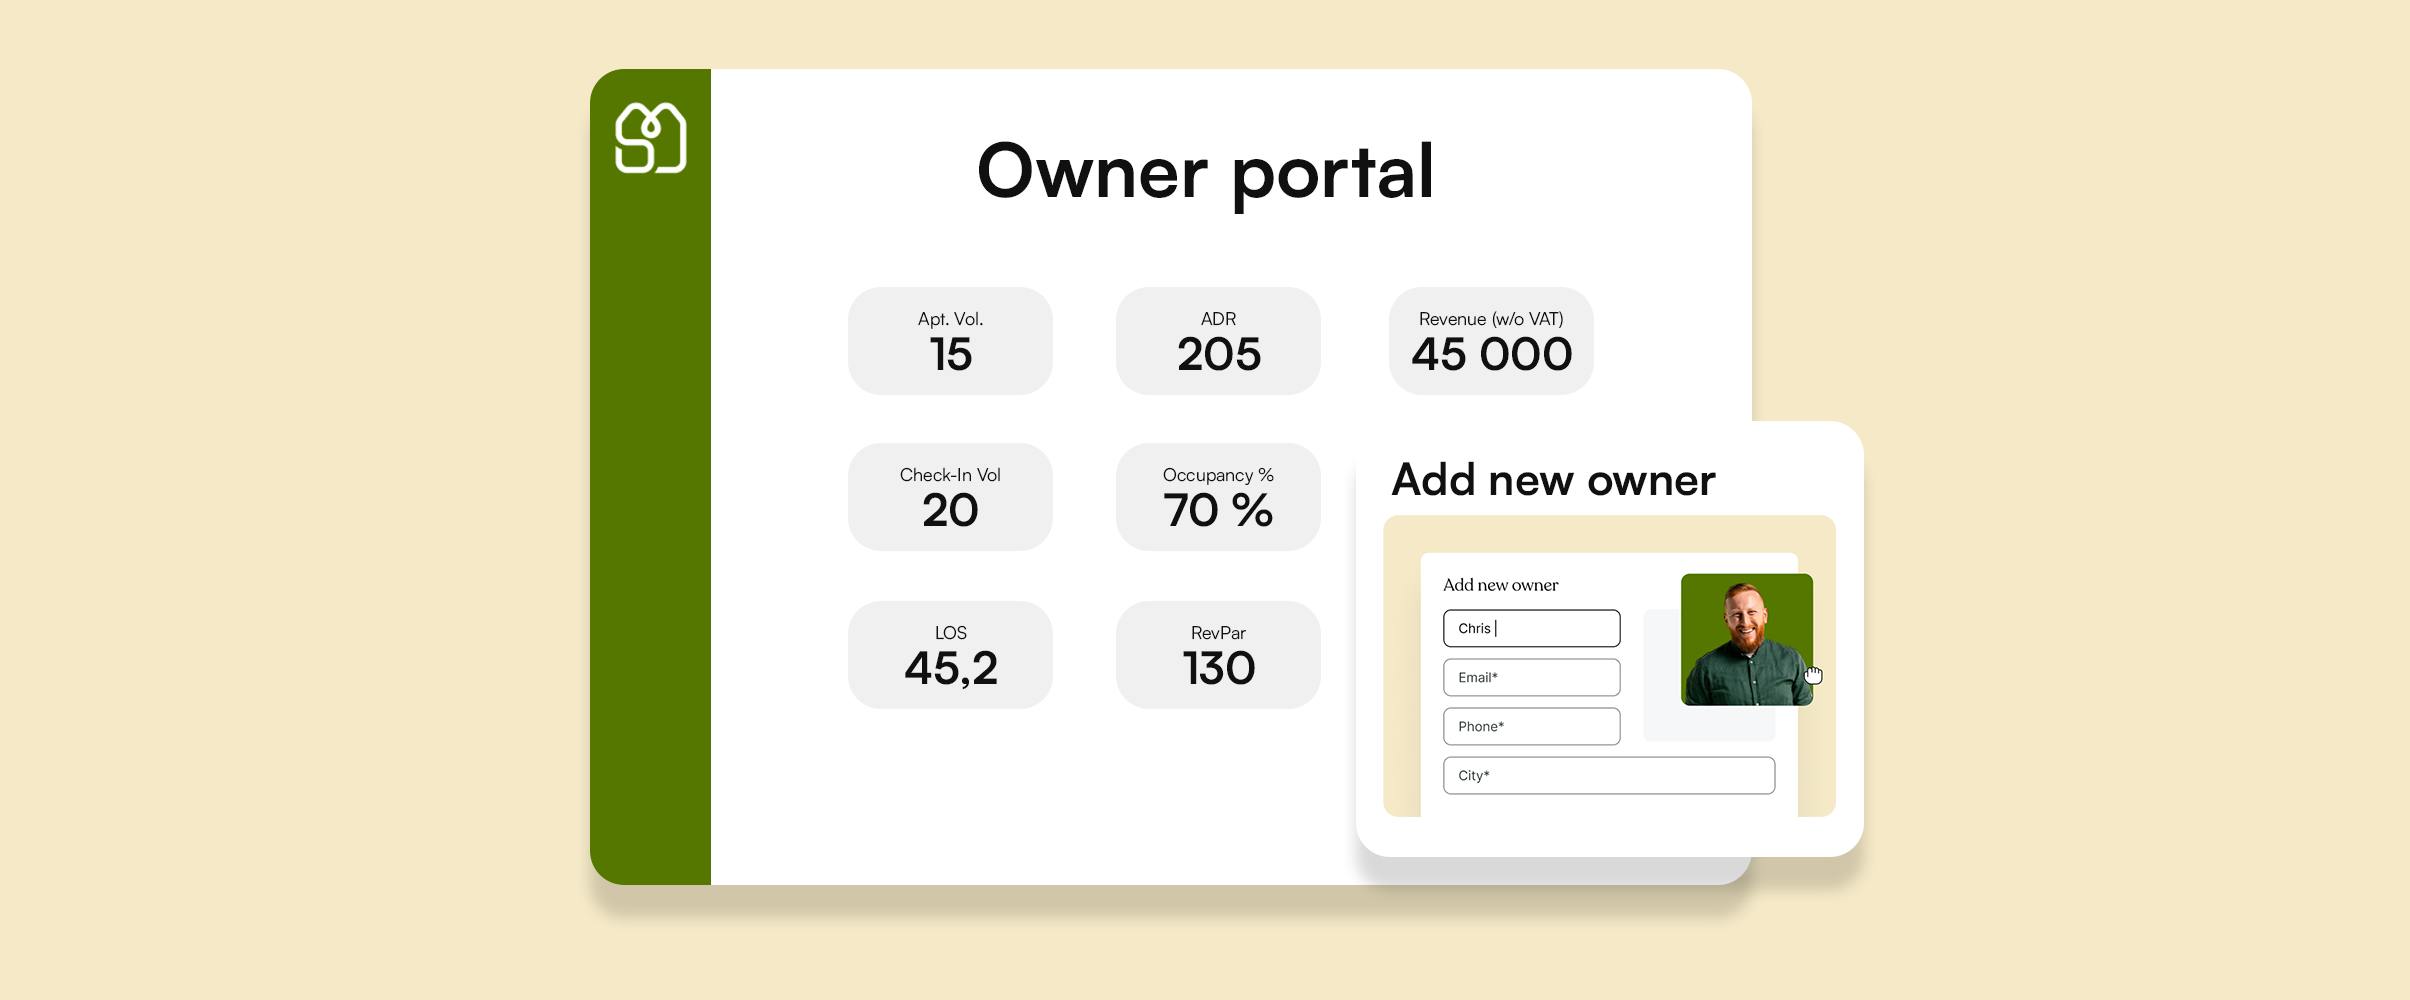
How to use the owner portal?
Transparency with owners is the key to your success as a vacation rental business. Through sibo, Property owners can access their own portal to be aware about every relevant information related to their listings.
Read more +